Monday, June 17, 2013

Vacation!!!

Hey all!  The next few posts will be about my vacation to South Dakota and North Dakota last week!  I love South Dakota, there are so many things to see out there like Mount Rushmore, Crazy Horse Memorial, Custer State Park, Bear Country park, many caves, the Badlands, and Devil's Tower!  Our first stop is to see and feed the Prairie Dogs right before you enter the Badlands, this is one of my favorite things to do!  There is a gift shop and you pay 50 cents for a bag of unsalted peanuts for the prairie dogs.  They are kinda skittish at the beginning of the season so they were a bit hesitant to take the peanuts from my hand.  After a little coaxing though, they come up.


They are so adorable, I wish I could take one home!  I know, you are all thinking about Monkey Pox right now, but the prairie dogs that had Monkey Pox where imported from Africa so it is now illegal to import prairie dogs.  You can purchase them from a breeder if you want one as a pet and they are Monkey Pox free!
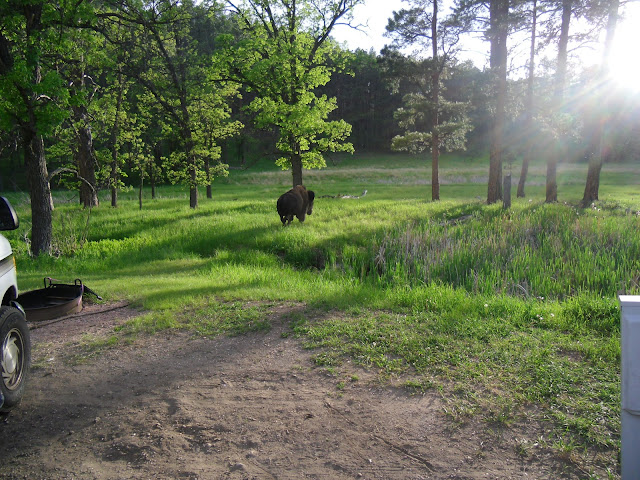
Our next stop was Custer State Park.  We camped in the Grace Coolidge campground and found out that there was a resident Bison that lived there and in the adjacent prairie across the creek!  We soon found out that the pathway to the creek was THROUGH our campsite!  He was fearless and he didn't seem to care who was there taking his picture or what!  When we first arrived he was hanging out near the resident camper scratching himself on the dumpster and on signs near their camper.


One morning while I was sleeping (in the van and NOT in the tent, I might add) he startled John when he was making breakfast.  John heard a noise looked to his right and the Bison was approaching fast!  He had very little time to run around to the other side of the picnic table to watch the Bison walk through our campsite and cross the creek!  There was maybe 5 or 6 feet between John and the Bison!  Here I am hiding in the van taking his picture as he walks across the street to walk through our campsite!


 This is our picnic table, he just crossed the creek and stopped to take a drink before continuing on his way.


It was pretty terrifying at first but we soon got used to him and just got out of his way and let him walk through!  John named him Bucky Bison!  It was quite the adventure and not what you usually encounter while camping!

Wednesday, June 5, 2013

Weaving!

I have also been weaving in my spare time on my new/used Kircher Rigid Heddle Loom!  I had to watch a few youtube videos on how to warp a Rigid Heddle Loom and since this is an old loom manufactured in Germany, the instructions they make available on their website are all in German.  Unfortunately I don't speak any German but luckily I was able to figure out a workable warping method.  Warp refers to the vertical strands that create the length of the woven object.  The Weft refers to the strands that create the width of the fabric.

Here I am stringing the warp through the Heddle to the end of the table where I have clamp to wrap the warp around.
After all the strands of warp are threaded through the Heddle, you cut through the loop of all the strands that are wrapped around the clamp and you wind up all the warp on the opposite end of the loom.

As you can see above, I have wound the warp on the end of the loom and then turned it around so the cut ends are facing me.   There are 2 strands running through each slot on the Heddle, you have to remove the top strand and thread it through the tiny hole to the left of it's partner.  Do this will every single one, this is quite time consuming!

When this is done, you create groups of threads and tie a knot in them, you can then thread a spare piece of yarn through the middle of the threads and the knot will hold it in place while you attach it to the front beam of the loom. See below:
You can adjust the tension of the warp threads by tightening or loosening the string.  I will post some more pics of the actual weaving a little later and I will show how to finish the piece so that it looks nice on the ends.  Happy Crafting!!

Pond Update!

We got a break in the rain recently which allowed me to work on my pond addition!  Now last year, my son and I dug about 70% of the new pond and this summer I made it a bit bigger. I added some levels, opened the wall of the original pond created a channel between the two ponds and put in an upper pond which will be the waterfall.  It has been terribly exhausting and I realized that I can't dig and lift big rocks for 4 and a half hours and not pay for it later!  So I think this will be the last addition to my pond as I doubt I will have the strength and energy in another 8 years!  While this project isn't complete it is pretty close, so here are some pictures.  Here is the upper and lower levels of my original pond that I put in about 8 years ago.

 Below you can see the lower level of the original pond and the upper and lower of the new pond directly behind.
 You can see that we lined the pond with old carpeting.  This makes the best underlayment as it is flexible, doesn't decompose and protects the flexible liner from roots, rocks and burrowing animals.
 The upper pond did not come with a built in fall so we will have to create one.


The liner is in, and as it fills you add rocks and you trim the extra liner away when you are all done placing the rocks.  I have a lot of rocks to place, a new waterfall to build, and the old waterfall which has been leaking the last couple years will be dismantled and rebuilt as well.
As you can see rocks have been removed exposing the old liner which will have to be removed and replaced.  I have a lot of work to do!!!  I keep telling myself how pretty it will be when it is done and how I will never make the pond bigger again!!!  For now I am taking a break from this project for a little while and I will post pics later as it progresses!

Thursday, May 30, 2013

I recently had another Dim Sum party which turned out to be a total hoot!  First of all, Dim Sum is a Chinese tradition where you get together and order little appetizers off various carts that they roll around the dining room.  The words Dim Sum literally mean "of the heart."  Dim Sum options can be either steamed sauteed or deep fried.  The portion sizes are small and the waiter pushing the cart marks a card at your table.  At the end of the meal you bring your card up to the register and they tally up how many little appetizers you had.  Ours version isn't exactly traditional in that we will serve some Thai dishes or even Phillipino dishes, but we always have a good time.  I was telling everyone how my dumplings look so much prettier since I watched a you tube video on how to fold them correctly!

This picture makes me laugh because it looks like it should be on a coupon offering a discount at Nancy's Dim Sum Palace or something!

After dinner we went down stairs into my Retro Room to listen to Herb Alpert and the Tijuana Brass and drink cocktails!  This is a room I am always working on and one of my ongoing projects.  I have been filling it with memorabilia from the 60's so that you can hang out there, read magazines from the era, play with games from the era and listen to music from the era.  My friend Hannah took all these great photos and they are great!  Thanks, Hannah!!

 Yes, it is a disco ball, I love those things!!


 Hey!  What'll ya have?


Here I am with my Shirley Temple, yeah, I know that's lame. LOL!

 Here's a close up of the bar stools!


 Here's bartender John making some Margaritas!

It was a great time!  We looked at old vacation slides! HA!  Looked at View Master reels and read some old Life magazines!  I will post some brighter pictures of the Retro room a little later!


Thursday, May 23, 2013

Como Zoo

I went to the Como Zoo recently with my husband, my son and his girl friend.  They have the most adorable little monkeys with really long white mustaches!  I can't remember what type of monkey they are but they look like they should be in a Dr. Seuss story!  This one in particular was very interested in my son's key chain and everything that hung on it.  We spent a great deal of time just watching him look over these keys over and over again and he was right up against the window too!  They are so adorable, I took a couple pictures, I hope you enjoy them!!


What cute little mustachioed monkeys!!

Beautiful Jewelry

My son came home from College last weekend and I've been so excited to see all that he accomplished.  He was taking classes on how to repair and manufacture fine jewelry.  Although he didn't learn how to cut any gemstones, he did learn how to set them and how to manufacture some of his own designs.  I'm super proud of him but of course he just sees where he needs improvement.  I have a couple pictures of some of the items he made, these are made with Alloy (not gold) and Cubic Zirconia.


 These are close ups, and not very good ones I might add as they are from my cell phone.  Here are some other pictures of the rings.


Here's a set of earrings he made that are really beautiful!


I'm hoping he continues with it and tries to get an Apprenticeship where he can really practice his skills.  I think everything looks amazing and he doesn't think so, he just thinks I say that because I'm his mom!  Well, maybe I am a little biased!


Thursday, May 2, 2013

My package came!

I got my package from my yarn swap partner who is not the same person I sent a package to.  I almost feel guilty as I think she went way over the amount she had to spend :/ but everything is wonderful!  The theme of the swap was Steam Punk- which should give you an idea why she sent me what she did.  Here are the pictures!!


She made the gifts and sent a bunch of keys, watch parts and other cool things for me to craft with- I can't wait to make something with them-and sent lots of other items!  Yarn swaps are really fun and a lot of people participate in them. Ravelry.com which is an online community for people who knit, crochet, weave, and spin their own yarn has clubs you can join to get in on these swaps, or to get free patterns, meet new people, etc. it's really great!